
wktools Version 4 Documentation
(c) 2003 - 2013 by Mathias Spoerr
|
|
wktools Version 4 Documentation |
Table of contents:
1. General
wktools is a collection of tools which simplify the work with network devices, especially Cisco devices. At this time there are the following tools included:
Configmaker, IP list, Configure Devices and Device Information Parser.
How to work with these tools is explaned in the following document.
1.1. License
The application is FREEWARE. Use at your own risk.
1.2. Questions and Feature Requests
Please send questions and Feature Requests to wktools@spoerr.org
1.3. Bug Reports
Please send Bug Reports to wktools@spoerr.org
1.4. Using wktools
1.5. Automatic version check
This feature was added in wktools Version 3.3.0.0.
wktools now checkes if there is a newer version available for download. It establishes a http session to www.spoerr.org and downloads a file with the version information. No other information is exchanged and all traffic is unencrypted.
Due to personal firewalls the version checker sometimes gets no connection and needs to timeout before the tool is startet. For the user it seems that the tool is not working. If this is the case for you, please disable the version check function in the Settings.
1.6. wktools.xml
All settings and tool profiles are saved in wktools.xml, which must be located in the same folder like wktools.exe.
2. wktools GUI
2.1. GUI layout
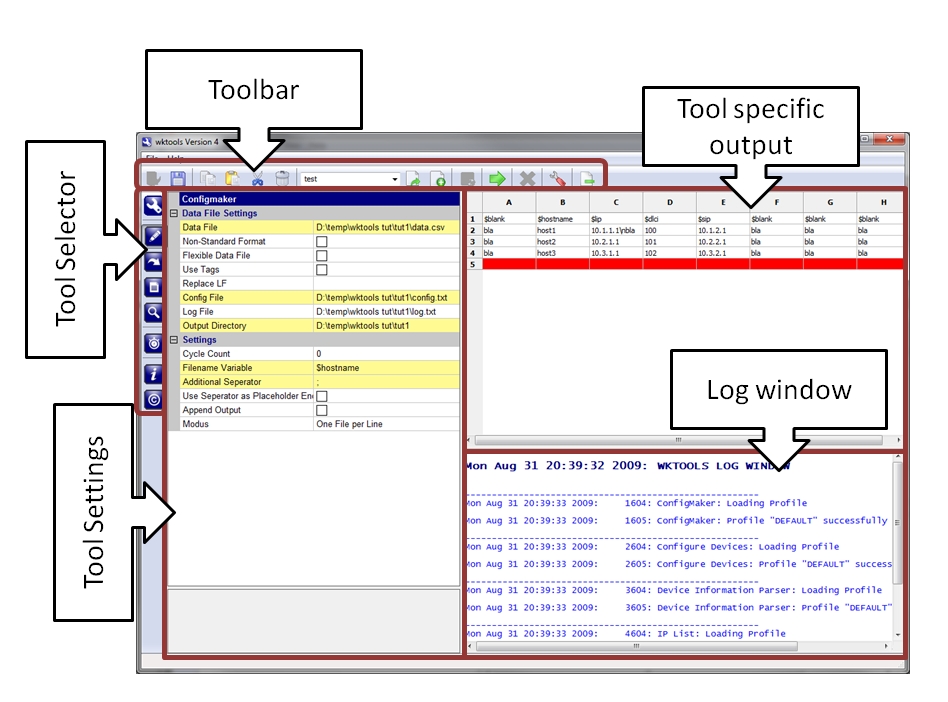
2.2. Toolbar

|
Load File - Only available for Scheduler to load a Scheduler File |

|
Save Log output to file; For Scheduler it's used to save the Scheduler table |

|
Copy selected Log window output to clipboard |

|
Paste clipboard to Log window |

|
Cut selected Log window output |

|
Delete Log Output |
| BOX |
Profile Selector DropDown Box Select or fill in the Profile name to load/save/remove. |

|
Load selected Profile Choose the profile to load in the drop down box |

|
Save Profile Write the profile name into the drop down box or select an existing profile to overwrite it. |

|
Remove Profile Delete the selected profile. |

|
DeviceGroup Refresh - Only available for Configure Devices; Load Device Group Table; Prerequisite to start Configure Devices |

|
DeviceGroup Save - Only available for Configure Devices; Save the displayed DeviceGroup Table into the specified file. |

|
Start/Stop Tool Select to start; unselect to stop |

|
Kill Tool - Use with caution. |

|
Settings |

|
XML Switch: Switch between the local and global wktools Config Files. The global Config can be specified under Settings. |

|
Host Search - Search for a host and to which switch it is connected to. |

|
MAC DB Update - Update MAC OUI Database; This will take a some minutes; The data is then used for the endpoint reports and for the Host Search Result. |

|
Detailed Log/Error Log - Select for Error log only; unselect for Detailed Log |
2.3. Tool Selector

|
wktools - General information |

|
Wizard: Quick Start for the most used operations. |

|
ConfigMaker: To simply generate many similar files/configurations. There are two data sources needed to achieve this: A pattern file and a data file. |

|
Configure Devices: To push/collect information to/from a network device. Supported protocols are Telnet, SSHv1+2, HTTP+S and Serial Console. |

|
IP List: To find and store IP addresses in config files. |

|
Device Information Parser: To parse Text files with "show" output from Cisco devices for Serial numbers, Module Information... - Very useful for making an inventory of your Installed base. |

|
Mapper: Generate network maps in Visio vdx format. Data sources are STP infos, CAM Table, ARP table, Interface infos and if available cdp neighbor infos. |

|
Scheduler: To schedule Tasks/Tools at a specified time or start one or more tools at one time. |

|
About - General information. |

|
License - End User Agreement |
2.4. Tool Settings
To specify the Tool specific settings. Each setting is described in detail below.
2.5. Log Window
All output of wktools is written into this window. Please use to toggle between "Full Log" and "Error Messages only" views.
A documentation of all error messages is available here.
2.6. Tool specific output
This section is differenty used from each tool. ConfigMaker uses it to display the Data File, Configure Devices shows the DeviceGroup File and DeviceInformation Parser diplays the result. The Scheduler lists all configured items.
2.7. How to use the GUI
This section is differenty used from each tool. ConfigMaker uses it to display the Data File, Configure Devices shows the DeviceGroup File and DeviceInformation Parser diplays the result. The Scheduler lists all configured items.
3. Global Functions
3.1. CLI Options
It's possible to start wktools with some parameters to automatically load a profile or start a tool or disable the GUI...
SYNTAX: wktools [-s] [-S] [-h] [-t tool -p profile]
Option Details:| -s |
silent Do not start the GUI. Most used with scripts or cron jobs, where you need no GUI. |
| -S | Save the output to the specified log file |
| -t |
tool Use this option in combination with
|
| -p |
profile Load the specified profile for the selected tool. Use this option always in combination with "-t" |
3.2. Settings
| Automatic Version Check | Enable/Disable the Automatic Version check functionality. It is used to see, if a newe rversion is available. To achieve this, a text file with the newest version number is downloaded from www.spoerr.org. |
| Highlight mandatory options | When enabled, all mandatory Tool options are highlighted in the Tool Settings. |
| For future use | For future use |
| Enable/Disable Report | Enable or Disable the Report function. If enabled, the important messages are written to the specified Report file. |
| Report File | Report File -> See "Enable/Disable Report" for more information. When empty, a default file is used. The location of the default file is the wktools binary folder. |
| Settings Font | Font Settings for the Tools Settings window. |
| Error Message settings | Checked error messages will be disabled and not shown in the log window/file. |
4. ConfigMaker
With this tool you can generate configuration files in a fast and easy way. To achieve this, two files are needed: A Template and a Data file. The variable parts are represented by a placeholder like $var in the Template. The data file includes the placeholder names and appendant values.
The output can be stored in two ways:
4.1. Data File Format
If the file is generated with MS Excel and line breaks within a cell are used, please check the "non-standard format" Checkbox. In this case, all "sub-linebreaks" are replaced by " // " and the existing Data file is overwritten with the new data to get compliant with the tool.
If you use Linux, line breaks within cells are not supported, since LF is used for all line breaks. In Windows, line breaks within Cells are marked with LF, while "global" line breaks are marked with CRLF.
4.1.1. Data File enhancements
4.1.1.1. non-standard format
Sometimes it is needed that Line breaks within cells are used in Excel sheets. In this case the line breaks are converted into csv with a LF character. A line break at the end of a line is specified with CR/LF. The LF onlys are now replaced with the string specified at the "Replace LF" option.
4.1.1.2. Flexible Data File
In this case the LFs described under 4.1.1.1. are used to separate data entries. Each entry is only used once. For an example see the Tutorials at www.spoerr.org/wktools.
4.1.1.3. Use Tags
Tags are specified with two beginning placeholder identifiers - i.e. $$n. With tags you can add Linebreaks or copy entries several times. To get an idea when to use this option (in conjunction with 4.1.1.2.) is, when generating Firewall object-groups where the number of entries could vary for each device.
Possible tags ($ is used in this example as placeholder indentifier):
4.1.2. Simple Example
Data and placeholders in tabular format:
| $hostname | $lip | $dlci | $sip |
| host1 | 10.1.1.1 | 100 | 10.1.2.1 |
| host2 | 10.2.1.1 | 101 | 10.2.2.1 |
| host3 | 10.3.1.1 | 102 | 10.3.2.1 |
Needed format:
    $hostname;$lip;$dlci;$sip
    host1;10.1.1.1;100;10.1.2.1
    host2;10.2.1.1;101;10.2.2.1
    host3;10.3.1.1;102;10.3.2.1
NOTE: This example also applies to the scenario when "Use Separator as Placeholder End" option is used.
4.2. Format of the Template File
Placeholders must be separated by the text with one of the following chars: CR SPACE /,.;:_-\|()[]{}<>
This statement is false when using the "Use Separator as Placeholder End" option.
4.2.1. Example
    hostname $hostname
    !
    interface Loopback0
     ip address $lip 255.255.255.0
     no shutdown
    !
    interface Serial0.$dlci point-to-point
     ip address $sip 255.255.255.252
     frame-relay interface-dlci $dlci IETF
    !
    ...
4.2.2. Example when using "Use Separator as Placeholder End" option
Additional Separator: ";"
    hostname $hostname;
    !
    interface Loopback0
     ip address $lip; 255.255.255.0
     no shutdown
    !
    interface Serial0.$dlci; point-to-point
     ip address $sip; 255.255.255.252
     frame-relay interface-dlci $dlci; IETF
    !
    ...
4.3. ConfigMaker Settings
| Data File | See 4.1 for more information and format guidelines. |
| Non-standard format checkbox | Use this option when the Data file is generated with MS Excel and line breaks within cells are used. |
| Flexible Data File | Use in case when one cell has more than one data element. See 4.1.1.2 for more information. |
| Use Tags | Tags are used in the config file and the tags are defined in the data file. See 4.1.1.3 for a list of available tags and guidelines. |
| Replace LF | Replace line breaks within cells in the data file with this string. |
| Config File | See 4.2 (Template File) for more information. |
| Log File | Not used at this time |
| Output Directory | The directory where the result should be stored |
| Cycle Count | Used to specify how often the replacement loop should run. Default is "1". Only needed when using Tags. |
| Filename Variable |
The value of this placeholder will be taken as filename for the output file.
Additional characters can be added to the variable as fix parts of the filename i.e. ->
variable is "$hostname", the separator is ";" and the filename variable sould be
"$hostname;bla". In this case "bla" is added to each filename. NOTE: "Use Separator as Placeholder End" must be checked if characters are added to the filename. |
| Additional Separator | This char is used as separator in the Data File |
| Use Separator as Placeholder End |
Use this option if there is no special character (see 4.2) between placeholder and data. Example: Placeholder: $test Template: $testTEXT In this case it is not possible to identify the placeholder. With this option all the placeholders have the same ending char - the "Additional Separator" Example: $test;TEXT Now the $test; placeholder can be identified and replaced by the data. Result (data for $test = 1234): 1234TEXT |
| Modus | The result will be stored in one file or in separate files. Select your choice. |
| Append Output if.... | If the output file already exists, the file will be replaced or the new output will be appended |
5. Configure Devices
With this tool you can automatically configure Cisco IOS, CatOS and PIXOS devices. Aside these boxes also Linux with the following prompt ending is supported: "$ ".
The supported protocols are Telnet, SSHv1+2, HTTP+S, CLI and Serial Console. This protocols can be combined with one of the following connection types:
Note: MultiHop: Don't forget "exit" at the end of the configuration file, because it is not sent per default!
When using the serial console, only MultiHop is supported, since one of the COM Ports is used as first Hop from which all others are configured.
When using the SSH, SSHv2 is always used first. When SSHv2 fails, SSHv1 is tried. Note:Since only one SSH is available anymore, there is a mismatch in the protocol index compared to older versions. If you have saved profiles with http or https, the profile needs to be edited.
When using HTTP or HTTPS, all output is saved in a file. The config file must contain the urls to request. When using an empty config file, "ip-address/" is downloaded and saved. Since wktools Version 4.6.0.0 it is possible to enter more than one URL.
CLI gives the ability to execute shell commands and save the output to a file. This may be helpful with commands like "curl" or "wget".
If there are "show" commands in the configuration, the output is stored in a file. The filename is either the Hostname or the IP address of the device. It's also possible to save the whole output in one file.
Note: "show" must be written out in full! Otherwise the output will not be saved.
The devices can have different configuration files and/or Username/Passwords. For different Usernames/Passwords there are two possible methods:
| Less or equal three different Usernames/Passwords |
|
| More than three different Usernames/Passwords |
|
Software upgrade for IOS devices is supported. The configuration file must include the following lines:
     copy tftp flash:
     1.1.1.1
     test.bin
     test.bin
5.1. DeviceGroup File
With Version 3.1 a new feature was added: Device Groups. This feature allows you to define the whole dynamic information within one csv file. If the DeviceGroup file is not specified, the Tool generates its own file. The information used to configure the devices is displayed in the Tool specific outout window. The data format is a List. In front of each entry is a checkbox to select the Hosts for the next run - only checked lines are used.
Each entry in the list can be edited and new lines can be added. The information provided in the list is the data basis for configuring the devices. The list is temporarily stored in "tempDevGroup.txt".
The Configuration File can be viewed by right clicking the config file name in the Device Group and using the "Show Config File" option in the popup menu.
If the Device Group data is generated by the tool, the settings in the "Settings Tab" change to "Use Device Groups" and the temporary DeviceGroup File is added to the Settings Panel.
Note: The first element in the table must be checked when using MultiHop. The used protocol in all lines must be the same for Multihop. The used protocol for connections from the first device is specified under "Multihop Command" setting.
5.1.1. DeviceGroup File Format
| Checkbox state | "x" for checked; leave blank for unchecked |
| Hostname | IP Address or DNS name |
| Username | Username |
| Login Password | Login Password |
| Enable Password | Enable Password |
| Config file | Config File to use |
| Protocol |
|
| Port | Port where Service is available at remote host |
| Terminal Server | Terminal Server Options |
| Multihop command | When using Multihop, then this command should be used to get to the next IP Address |
| Remark | Column for Remarks. They have no consequences for the configuration sequence and are only for helping the user interpreting the lines. |
5.1.2. Example
    x;1.1.1.1;user1;lopw1;enpw1;conf1.txt;Telnet;;;telnet $ip;host1;
    x;1.1.1.2;user2;lopw2;enpw2;conf2.txt;COM1;;;telnet $ip;host2;
    x;1.1.1.3;user3;lopw3;;conf3.txt;SSHv1;;;telnet $ip;host3;
    x;1.1.1.4;user4;lopw4;enpw4;conf3.txt;SSHv2;;;telnet $ip;host4;
    x;1.1.1.5;user5;lopw5;enpw5;conf5.txt;Telnet;;;telnet $ip;host5;
5.2. IP Address File Format
5.2.1. Example
    1.1.1.1; host1
    2.2.2.2;
    3.3.3.3; host3
5.3. Configuration File
5.3.1. Example of a config file with dynamic Username/Password
     !user = username           -> Username
     !lopw = login password     -> Login Password
     !enpw = enable password    -> enable Password
     !
     conf term
     logging buff 8000
     exit
     wr
     show run                  -> running configuration will be stored in file
     show version              -> show version output will be stored in file
     exit
5.3.2. Use of regular expressions as part of commands to complete them during runtime.
wktools4 supports regular expressions in commands. This feature allows you to complete specific commands during runtime. The regex is applied to the retur traffic of the previous command. The first match replaces the regex in the command.
Use [rgx] and [/rgx] tags to mark the regex. More than one regex may be used in a single command.
Here are some examples for the usage:
     conf t
     int lo 999
     do show ip interface brief
     ip address 10.10.[rgx](?<=FastEthernet1/0            192\.168\.)[0-9]+[/rgx].1 255.255.255.0
     do show run | i hostname
     description *** [rgx](?<=hostname )\b\w*[/rgx] ***
     no shut
     end
     exit
First expression: The 3rd octet in the IP address is looked up via the regex in "show ip interface brief" and the 3rd octet value from the IP address from Fa1/0 is used. The command, which is actually used, would be for instance: "ip address 10.10.56.1 255.255.255.0".
Second expression: The hostname, which is looked up from "show run | i hostname", is used for the interface description.
Sample 2: AAA server IP changed from 10.1.1.1 to 10.1.1.2 and the key is different on each device and the old key should be re-used...
     sh run | i tacacs-server host 10.1.1.1
     !IFRETURN (?<=10.1.1.1 key )[0-9]*.[a-zA-Z0-9]+
     #[rgx](?<=10.1.1.1 key )[0-9]*.[a-zA-Z0-9]+[/rgx]
     !ELSERETURN
     !EXIT
     conf t
     aaa accounting commands 1 default start-stop group tacacs+
     aaa accounting commands 0 default start-stop group tacacs+
     tacacs-server host 10.1.1.2 key [rgxMem]0[/rgxMem]
     no tacacs-server host 10.1.1.1
     exit
     wr mem
     exit
First expression: Reads the existing key from 10.1.1.1; If a key is returned, it is saved. Otherwise exit is sent to the device and nothing is changed.
RGX Memory: Each time a regex is used (with [rgx][/rgx], it is saved. The first time it is saved on position 0, the second time on position 1... The saved value can be recalled at any time with the [rgxMem]nnn[/rgxMem] option. The saved values are available until exiting the device.
5.3.3. Variables available in config files for CLI.
The following variables are availible for use in config files, but only for CLI mode:
5.4. Configure Devices Settings
5.4.1. DeviceGroup Settings
| Use Device Groups Checkbox | Use Device Group File (csv) instead of the settings below |
| DeviceGroup File | csv File to use |
5.4.2. Host & ConfigFile Settings
| Host File | See 5.2 for more information. |
| Config File | See 5.3 for more information. |
| Config File Option |
|
| dyn Config Folder | The folder where all specific configuration files are saved. |
| default Configuration File | The default configuration File. This configuration is used when no specific configuration is found. |
| File extension | The extension for the specific config files. Keep this field empty if there is no extension. Don't forget the dot (.) |
5.4.3. User/Password Settings
| Username | Username to access the devices |
| Login Password | Login Password to access the devices |
| Enable Password | Enable Password to access the devices |
| Visible Checkbox | Check, if you want to hide the entered values |
| Dynamic PW Checkbox | Check, if you want to use dynamic Username/Passwords. If checked, the Username/Passwords are specified in the beginning of each config file. |
For more information on how to use more than one Username/Password, please refer to 5.
5.4.4. Connection Settings
| Modus | Protocol to use |
| Type | SingelHop or MultiHop. See 5 for more information. |
| Telnet/SSH/HTTP/COM Port | Port, where remote service is running on server side. In case of Modus COMx, it defines the COM Port. Leave empty if standard ports should be used. |
| Terminal Server Connection |
Three options:
|
| Multihop Command |
Command to use when hopping from the first device to the next. Example: "telnet" OR "ssh -c des" It is possible to have a command where the IP address is not at the end. Example: telnet 1.1.1.1 23. In this case the variable $ip is used. Example: "telnet $ip 23" or "telnet $ip:23" |
5.4.5. Output Settings
| Show Output |
Specify the filename type for the show output - See 5
|
| Show Filename Pattern | Addition to Show Output: The specified characters are added between hostname/IP address and date. |
| Append Date to filename Checkbox | Current date will be appended to output filename if checked. This was the default behaviour until 4.8.0.0. Now it is user-definable. |
| Append Checkbox | If unchecked, override an existing file. |
| Logfile | Only used in CLI mode with "-S" option. If you need to save the output in GUI mode, please use the SAVE Toolbar button. Then the whol Log windows output will be saved to the a file. |
| Output Directory | The directory where all "show" files are stored. |
5.4.6. Advanced Settings
| Exec Mode |
what should be sent at login Mode (router>)?
Default: "enable" |
| Wait for Reply Checkbox |
Note: Don't disable this option, if you don't have a special need!
The program waits for a reply (#) from the device before the next command is sent. Sometimes it is useful to disable this behaviour. For example when configuring a banner message. In this case the device does not send a # before the break character is sent. The better way to send commands to the remote host, where no "#" is sent back as reply, is to use the !PARAGRAPH marker in the config. Please refer to 5.5 for more infos. There is a second way to disable "Wait for reply" temporarily: Use !BEGINBLOCK and !ENDBLOCK markers in the configuration file. At !BEGINBLOCK waiting is disabled and at !ENDBLOCK waiting is enabled again. The commands are placed between these two markers. |
| Configure "looging sync" Checkbox | Check, if you want to configure "logging sync" at all vty lines. This is useful to parse the error messages from an IOS device. Please refer to Cisco IOS Command reference for more information on this command. |
| Command in case of wrong password |
There are two choices in case of a wrong enable password:
|
5.4.7. Debug Options
Used to troubleshoot wktools internals.5.5. Special Config Tags
There are some tags which could be used in the configuration file for special handling. Some of them were already used above. Here is a complete list of them:| "!user = " | Username can be specified for use with dynamic Username and Passwords |
| "!lopw = " | Login Password can be specified |
| "!enpw = | Login Password can be specified |
| "!BEGINBLOCK" | Begin not to wait for # befor sending the next command |
| "!ENDBLOCK" | End not to wait for # befor sending the next command |
| "!PARAGRAPH" | Everything between two "!PARAGRAPH" statements will be sent at once ->
no need to wait for # and no need to use "BEGINBLOCK" and "!ENDBLOCK". This is the preferred method when banners or templates or similar things are configured with wktools. |
| "!CTRL+SHIFT+6 X" | Send Ctrl+Shift+6 x. Useful for connections with a terminal server |
| "show" | Collect every returning traffic and store it in a file until the next command is sent. |
| "!LOG" | It's working like "show" but for the next command in the config file. |
| "!CRLF" | Sends a CR/LF to the remote host. |
| "!IFRETURN" | The return traffic of the previous command is searched for a regex. If the expression is found, the following command is sent. If it is not found, the following command is suppressed. Example: !IFRETURN \d\d\d\d: The following command is only sent, if a 4 digit number is found in the return traffic of the previous command. A perl compatible regular expression syntax is used for this feature. For more information please see Perl Regex Syntax |
| "!ELSERETURN" | Use only in conjunction with !IFRETURN. If the regex in !IFRETURN is not found, then the following command is sent. |
| "!WARNING" | Use this tag to send a user defined warning message to the log window. The message is defiend in the same line.
Example: !WARNING: This is a test warning message! Nothing happens, only the message is printed to the log window. |
| "!ERROR" | Use this tag to send a user defined error message to the log window. The message is defiend in the same line. After the message is printed, the whole remaining config is deleted and exit and end is sent to the remote device.
Example: !ERROR: This is a test error message! The connection to the remote host is aborted! |
| "!EXIT" | Use this tag to clear the remaining config commands and send "exit" to the remote host. |
| "!ENDEXIT" | Use this tag to clear the remaining config commands and send "end" and "exit" to the remote host. |
| "[rgx]" and "[/rgx]" | Use the tags in a normal command and place a regular expression between them. The regex is applied on the return traffic from the previous command. The first match replaces the expression and the tags. This feature allows you to use variable commands -> the command is completed at runtime with data returned from the host. More than one regex may be used for a single command. Use separate [rgx] and [/rgx] tags for each regex. A perl compatible regular expression syntax is used for this feature. For more information please see Perl Regex Syntax Each regex result is saved and can be re-used with the [rgxMem] Tag. |
| "[rgxMem]" and "[/rgxMem]" | These tags are used to recall saved regex results. The index of each result is consecutive and starts with "0". The first regex in the config file gets index 0, the second one gets index 1 and so on... Example: ip address [rgxMem]0[/rgxMem] 255.255.255.252 - in this example, the regex result with index "0" is used as IP address. It was the first regex seen in the config file. |
| "!RGXCLEARMEM" | Resets "[rgxMem]" Memory |
| "!RGXBLOCK" and associated "[regex]" | Everything between two !RGXBLOCK statements will be duplicated. A Regex is defined right after the first !RGXBLOCK and this Regex is applied on the preceeding return value. The commands between the two !RGXBLOCK statements are duplicated for each Regex match. Use [regex] tags as placeholders together with the commands. The [regex] tag will then be replaced by the Regex match. Multiple [regex] Tags may be used, but they are always replaced by the same value. Example: conf t do show int statu | i ( 60 ) !RGXBLOCK ^[a-zA-Z]+[0-9]+\/[0-9]+\/[0-9]+ int [regex] switchport access vlan 61 exit !RGXBLOCK end wr mem exitIn this example all Switchports in VLAN 60 will be reconfigured with VLAN 61. |
| "!cmd-prefix" | Usage: "!cmd-prefix STRING", where STRING is some prefix for the following command. Example: !cmd-prefix CMD: show running-config Output will be: "CMD:show running-config" |
| "!device" | Usage: "!device PREFIX hostname|ip POSTFIX", where PREFIX and POSTFIX may be not used. With this tag, the IP address or hostname with some optional pre/postfix will be added to the output file at the specified position. Example: "!device DEVICE ip" would be DEVICE 10.1.1.1 in the output file, when the device IP is 10.1.1.1 |
| "!remove-newline" | Remove all CR in the output file from this position to the end. |
| "!showOutput" | To define the show output file in the config file; This may be useful if you want to split the output in several files Usage: "!showOutput sometext", where sometext is the pathname+filename of the output file. The following variables my be used at any position of "sometext":
|
6. IP List
Use this tool to search configuration files in a directory, including sub directories, for IP addresses of a specified Interface. The result will be stored in a file.
The files to search can be restricted using search patterns for the file name.
A second option would be to scan IP address ranges for open ports (22, 23, 80, 443) and store the result in a file. Only the first open port is documented. This file could be used as input for "Configure Devices". The Port information will also be used.
The tool first tries to ping the remote host and then scans for open ports. The icmp echo operation only works, when the tool is started with Admin/root privileges.
6.1. IP List Settings
| Tool Option |
Select the Tool you want to use:
ConfigFile Parser: Search a directory for config files and parse them for IP addresses of a given interface. Portscanner: Scan network ranges for devices and open ports where you can connect to later with "Configure Devices" |
| Search Directory | Folder, including sub Folders, which will be searched for configuration files. |
| Search Patterns |
|
| Interface | The name of the Interface of which the IP address should be searched. |
| Interface Number | Interface Number of the previously defined interface. |
| IP Address List |
IP Address Range to scan.
Define Ranges with "-" and separate entries with ";".Only ranges and single IPs are supported. Usage example: 192.168.1.1;192.168.1.10-192.168.1.100;192.168.1.150-192.168.3.5 |
| Output Directory | The directory where the result is stored. |
| Modus | The result will be stored in one file or in separate files. |
| Append Output if.... | If the output file already exists, the file will be replaced or the new output will be appended |
7. Device Information Parser - OBSOLET AND REMOVED
NOTE: No more maintenance is done for this tool. Use Mapper instead. The tool will be removed in one of the next releases.
This tool parses text files with show output from Cisco devices. Currently there are two parser implemented:
7.1. Inventory Parser
With this Parser you can easily do an inventory of your installed base of Cisco devices.The following information is collected and saved as csv:7.1.1. Supported Devices
Since nearly every Cisco device has different show commands and format for the output, not all devices are supported. At this time it is tested with the following hardware:7.1.1.1. Cisco Router
7.1.1.2. Cisco Switches
7.1.1.3. Cisco Other
It may work for other IOS or CatOS hardware but there is no guarantee for it. If you have problems with any kind of IOS/CatOS hardware please send an email to wktools@spoerr.org.
7.1.1. Format of the file to parse
When the data is collected, the following template must be used, even if some of the commands are not supported by some or all devices. If the template is not used, the result is unspecified. If you use wktools to collect the data, you may use the "Inventory" Config Option.7.1.2.1. Template for all devices except 6200 DSLAMs
     show ver           ! Version Information
     show snmp          ! Location Information
     show module        ! Module Information for CatOS Devices
     show c7200         ! NPE Information for 7200 routers
     show diag          ! Module Information for IOS devices
     show invent        ! Module and Chassis Information for IOS devices
     show hardware      ! Module Information for LS1010 devices
     show system        ! Powersupply Information for CatOS devices
     show file system   ! File system Information for getting flash sizes
     exit
7.1.2.2. Template for 6200 DSLAMs
     show ver
     show harware chassis
     show hardware
     show hardware slot x   ! where x is the Slotnumber (Information for all Slots should be collected)
     exit
7.1.2.3. Cisco IP Phones
The information for IP Phones is collected via http or https. Only the main page is needed (ip-address/).7.2. Interface Information Parser
With this Parser you can collect interface status information like sent/received Packets or Bytes or Interface errors. At this time only IOS devices (routers and switches) are supported.
The output will be comma separated file (.csv) with ";" as separators.
The information the parser uses to collect the statistics is from "show version" and "show interfaces" output. The output of each device has to be stored in a separate file and the output of both commands must be collected. Otherwise the Parser will fail.
7.3. GUI explanation
|
Search Directory |
Folder, not including sub Folders, which will be searched for configuration files |
|
Search Pattern |
|
|
Output Directory |
The directory where the result should be stored |
|
Output File Name |
The name of the csv file |
|
Append |
If the output file already exists, the file will be replaced or the new output will be appended |
| SNMP Location columns | The number of the SNMP location columns. This feature can be used to read csv information in the snmp location. Sometimes there are ";" used in snmp locations. If this is the case, specify the number of ";" +1 in this option => minimum is 1. This option is only available for the Inventory Parser. |
| Only collect chassis information | Only one line per device is added to the output file. This line includes the chassis information like S/N, memory, Version... |
| Show the following columns | Uncheck the Column you do not want to have in your output. This option is only available for the Inventory Parser. |
| Don't collect Interface Descriptions | This option should be used if you have ";" in your Interface Descriptions. If ";" are used,
the output would be shifted because a ";" is used as indicator for a new column. This option is only available for the Interface Parser. |
8. Mapper
The Mapper tool automatically draws a network map in Visio vdx format. Data sources are STP infos, CAM Table, ARP table, Interface infos and if available cdp neighbor infos.
The needed information can be collected by wktools or any other tool.
Supported devices: Cisco IOS Devices (router, switches, WLAN...); Cisco Nexus Switches; Cisco PIX and ASA Firewalls; Cisco IP Phones
There is a Lua Interface available to import custom parsers for unsupported devices. Please see this ducument for more information and API documentation: wktools4 Mapper Lua API
8.1. Mapper - HowTo
Two steps are needed to get the Visio drawing: Collect the needed data and then parse analyze it. The second part is done by Mapper. For the first step you can use wktools - Configure devices or a third party tool. The output of the following commands is needed. Please watch the order of the commands in case you use a 3rd party tool:
show version
show interface
show arp
show mac-address-table
show spanning-tree detail
show cdp neigh det
show ip arp
show mac address-table
show vpc
show ip route | excl B |Null0|connected
show ip bgp sum
show ip ospf neigh det
show ip eigrp neigh det
show crypto ipsec sa
show ospf neigh det
show eigrp neigh det
show route | excl connected|Null
show switch virtual link port
show snmp
show spanning-tree
show interfaces switchport
show module
show c7200
show diag
show inventory
show hardware
show system
show file system
show power inline
show ip route vrf all
show vrf interface
show ip vrf detail
show ip arp vrf all
show failover
show fex
show ip ospf
show ip ospf interface
show ip bgp neighbors
show ip route vrf xxxx
show ip arp vrf xxxx
For Cisco IP phones the following pages are needed:
DeviceInformation
NetworkConfiguration
PortInformation?1
DeviceInfo
NetworkCfg
NetworkInformation
DeviceInformation
WLANStatistics
localmenus.cgi?func=604
localmenus.cgi?func=219
localmenus.cgi?func=601
8.1.1. Collect the needed data with wktools
Step 1: Create new profile in Configure Devices with the following settings:
Step 2: Press "DeviceGroup Window Refresh" Button
Step 3: Select all devices for which you want to collect the data
Step 4: Press "Start" Button
Step 5: Wait till Configure Devices ends and view the report if everything was ok
8.1.2. Mapper - HowTo
Define Search Directory, Output File and the needed options. Then press Start. After Mapper finished, open the .vdx file and do the needed fine-tuning.
Click here for a Mapper HowTo (only in German)
8.1.3. Mapper - Import devices
If you want to see Non-Cisco and Non-cdp devices in the network map and/or Report, use the import function. It is applicable for end-systems, but not for network devices.
File format:
Example:
Test-1;10.1.1.1;;;Test-Location-Rack1;12;testdevice_1;1234567890;
Test-2;;1234.5678.90AB;;Test-Location-Rack2;12;testdevice_2;9922334455;
Test-3;10.1.1.3;1111.2222.3333;Intf23;Test-Location-Rack3;12;testdevice_2;5676432456;
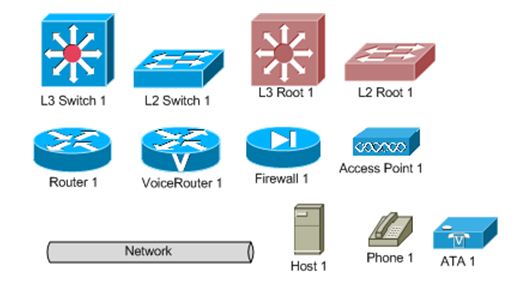
8.2. Symbols used in the Visio output
8.2.1. Systems and Networks
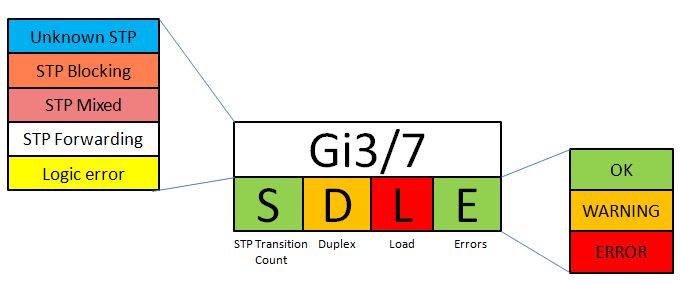
8.2.2. Interfaces
|
Unknown STP |
Unknown Neighbor which speaks STP |
|
STP Blocking |
Interface is in STP Blocking mode for all Vlans |
|
STP Mixed |
Indicates that the interface is in Blocking mode for some VLANs and in Forwarding mode for other VLANs. |
|
STP Forwarding |
Interface is in Forwarding mode for all Vlans. |
|
Logic Error |
Please check the connection, because it was not posssible to calculate the neighborship clearly. |
|
STP Transition Count |
Interface with more than 15 STP transitions. This indicates an instable Spanning Tree. |
|
Duplex |
Orange indicates that the interface is operating in half duplex mode. |
|
Load |
Orange: High interface utilization - Load > 100 Red: Very high interface utilization - Load > 200 |
|
Errors |
Orange: The sum of all interface errors (input, output, giants, throttles...) is higher than 10. Red: The sum of all interface errors is higher than 1000. |
8.3. GUI explanation - Mapper Settings
|
Search Directory |
Folder, including sub Folders, which will be searched for files with the needed information. |
|
Search Pattern |
|
|
File with Import data |
File with devices to import to the database. See 8.1.3 for more information. |
|
Import Checkbox |
When checked, the devices in the file above shall be imported. |
|
Import EndSystems Checkbox |
When checked, End Systems will be imported to the DB. Be careful, because this may take a while. |
|
Reverse Lookup for Endsystems Checkbox |
When checked, a DNS reverse lookup is done for all EndSystem IP addresses to get the associated hostname. Only use this option when the DNS server is reachable. |
|
Output file |
Filename for the result; Dont forget .vdx as filename extension; |
|
Log File |
Log File for Error Log |
|
Output Options |
|
|
Options |
|
8.4. Important Notes
8.4.1. General
8.4.2. Spanning Tree
8.5. Host Search and MAC DB Update
8.5.1. MAC DB Update -
Press the MAC DB Update Toolbar Button to download the latest version of the IEEE OUI listing (http://standards.ieee.org/develop/regauth/oui/oui.txt) and import it to wkm.db. The data is then used for additional information for "Host Search" and seeveral Reports.
8.5.1. Host Search -
To look up end-systems in your network. You can either search for the MAC address, IP address, or Switchport to see where a device is connected to. The data source is wkm.db, which is filled during Mapper Parsing. The result is written to the Result Text-Box and the global Log-Window.
9. Scheduler
The Scheduler is used to create on-demand or scheduled tasks for the tools.9.1. GUI explanation - Task List

|
Checkbox |
Checked items will be processed by clicking the Start or Delete Button |
|
State |
Status Information |
|
Name |
Unique name of the task - This name will be used as Windows Task Name |
|
Tool |
Tool Name. |
|
Profile |
Saved Profile for the specified tool. |
|
Date and Time |
Date and Time when to run this task. |
|
Repeat |
How to run this task:
|
9.2. GUI explanation - Scheduler Settings
|
SchedFile |
Where to save the task list. |
|
Username/Password |
Specify the account datails to schedule the task. |
9.3. Task Types
9.3.1. On-Demand Tasks
These tasks are only executed when they are selected (checked) and the Start Button is pressed. The tasks run one after another. It is not possible that two or more tasks run parallel.9.3.2. Scheduled Tasks
Scheduled tasks are activated and stored as Windows task by clicking the "Start" Button. All saved Windows Tasks are listed in the "Scheduled Tasks" window:
Click Start, click All Programs, point to Accessories, point to System Tools, and then click Scheduled Tasks.
Please specify Username/Password in the Settings section. This account information is used to create and run the task.
10. Wizard
Quick Start for the most used operations: Draw Network Map; Collect Inventory; Config Backup
No need to configure each tool separately if standard options are sufficient. The settigs are saved in each tool, so they can be re-used later.
10.1. GUI explanation
|
Modus |
Select one of the following operations:
|
|
Work Directory |
Specify the folder, where all temporary data and the result is saved. |
|
IP Range |
IP Address Range to scan.
Define Ranges with "-" and separate entries with ";".Only ranges and single IPs are supported. Usage example: 192.168.1.1;192.168.1.10-192.168.1.100;192.168.1.150-192.168.3.5 |
|
Username |
Username (for Authentication with remote host) |
|
Login Password |
Login Password (for Authentication with remote host) |
|
Enable Password |
Enable Password (for Authentication with remote host) |
|
Profile Name |
This string is used as Profile Name for saving all tool settings, so they can be used again later. |
|
|
wktools Version 4 Documentation |