
wktools Version 4 - Advanced Operations with "Configure Devices"
(c) 2003 - 2012 by Mathias Spoerr
|
|
wktools Version 4 - Advanced Operations with "Configure Devices" |
Table of Contents
3. Separate configuration per device and Configuration HowTo
4. Multihop with a single configuration file
1. Scope
wktools can be used to automate simple and advanced config changes for Cisco devices. The executed commands may be different for each device and/or may be derived from device-specific information, like the running-configuration. Based on real-live examples this document describes the available options.
The commands are saved in files and wktools reads one file per device. The file may be the same for all devices. The examples show the used configuration for different use cases.
2. Use Cases
2.1. Collect information
The easiest and most used option is to collect information from devices and to store this information in files.
Whenever a "show" command is sent to the remote device, the return data is saved. Therefore this option may be used to backup configurations.
Simple example for configuration backup:
   show running-config
   exit
It is very important to write out "show" in full. Otherwise the output will NOT be saved.
2.2. Config Templates
wktools provides templates which may be used to collect data for the built-in Parser tools. The template is used instead of the dedicated config file.
Available templates (configurable under ConfigFile Option):
2.3. Reset SNMP Community on all devices
The following config file sets the SNMP community on all devices to a new value:
   conf t
   snmp-server community abcd1234 rw 99
   end
   wr mem
   exit
2.4. Regular Expressions and Conditions
To do changes based on the active device configuration, Regular Expressions may be used.
The following examples show three use cases with simple and advanced Regex usage.
More information on Regular Expressions is available here.
2.4.1. Simple
   conf t
   int lo 999
   do show ip interface brief
   ip address 10.10.[rgx](?<=FastEthernet1/0            192\.168\.)[0-9]+[/rgx].1 255.255.255.0
   do show run | i hostname
   description *** [rgx](?<=hostname )\b\w*[/rgx] ***
   no shut
   end
   exit
Description:
The IP address on interface Loopback 99 should be set. The third octet should be the same as the third octet of the FastEthernet1/0 IP address.
In addition, the hostname should be used as interface description.
Step 1: Read FastEthernet1/0's IP address: "do show ip interface brief"
Step 2: The regex is applied on the show command's return value. Important are the [rgx] und [/rgx] tags for regex definition.
The regex is searching for "FastEthernet1/0 192.168." and returns all subsequent numbers until the first non-number is reached.
The regex is executed immediately.
Step 3: The same approach is used to configure the interface description: The regex after the show command is used to get the hostname.
2.4.2. Changing the TACACS Server IP address, but the shared secret should stay the same and may be different between the devices.
A new TACACS server is installed in this use case. All data is migrated from the old server, but the IP address has changed.
The Tacacs shared secret is different for some device groups and therefore it must be re-used when changing the TACACS server IP address on the network devices.
The example shows the usage of Regular Expressions in conjunction with Conditions (!IFRETURN, !ELSERETURN, !EXIT). In addition the regex result is stored for later usage.
   sh run | i tacacs-server host 10.1.1.1
   !IFRETURN (?<=10.1.1.1 key )[0-9]*.[a-zA-Z0-9]+
   #[rgx](?<=10.1.1.1 key )[0-9]*.[a-zA-Z0-9]+[/rgx]
   !ELSERETURN
   !EXIT
   conf t
   aaa accounting commands 1 default start-stop group tacacs+
   aaa accounting commands 0 default start-stop group tacacs+
   tacacs-server host 10.1.1.2 key [rgxMem]0[/rgxMem]
   no tacacs-server host 10.1.1.1
   exit
   wr mem
   exit
Description:
Step 1: Read the current TACACS shared secret
Step 2: By using !IFRETURN in conjunction with regex, the return value is checked whether or not a TACACS configuration is available. [rgx] and [/rgx] tags are not needed in this case, because the remaining string after !IFRETURN is interpreted as Regular expression.
Step 3: If !IFRETURN returns "true", the next line in the configuration is used - In the example the regex result is saved. This is done always when using the [rgx] and [/rgx] tags. The result is stored at position "0" in the regex memory when the tags are used the first time. Position "1" is used the second time...
Step 4: The line after !ELSERETURN is used in case !IFRETURN returns "false". !EXIT would delete the remaining commands and close the connection by sending "exit".
Step 5: If a TACACS configuration was found, the remaining commands are now executed. [rgxMem]0[/rgxMem] recalls the regex result stored at position "0" in the regex memory (Step 3).
Important Notes:
   Command
   !IFRETURN regex
   Command for !IFRETURN is TRUE (only 1 command is supported)
   !ELSERETURN
   Command for !IFRETURN is FALSE (only 1 command is supported)
   Remaining configuration
2.4.3. Insert a new Firewall ACE right before an existing ACE, which may have different ACE line numbers
This example is similar to the previous one. The goal is to look up the line number for a given ACE and insert a new ACE right before the existing one.
   conf t
   sh access-list acl-name | i udp object-group Clients object-group Server-1 object-group UDP-Ports
   !IFRETURN line \d\d
   access-list acl-name [rgx]line \d\d[/rgx] extended permit tcp object-group Clients object-group Server-1 object-group TCP-Ports
   !ELSERETURN
   !ERROR ACE not found!
   no access-list acl-name extended permit udp object-group Clients object-group Server-1 object-group UDP-Ports
   access-list acl-name [rgxMem]0[/rgxMem] extended permit udp object-group Clients object-group Server-1 object-group UDP-Ports
   end
   wr mem
   exit
Description:
Step 1: Look up the needed ACE line number
Step 2: Check with !IFRETURN whether the return value is ok.
Step 3: If ok, configure the new ACE. Otherwise show an error message ("ACE not found!") and close the connection (!ERROR).
Step 4: Delete the original ACE and re-insert it at the previously saved position ([rgxMem]0[/rgxMem]).
2.4.4. Reconfigure all VLAN 60 switchports with VLAN 61 (Version 4.6.9.0 needed)
This example shows how to set a new VLAN 61 for all ports with the current VLAN 60. The Regex matches all ports named Nnx/y/z, where Nn is the port name and x/y/z is the port number.
	conf t
	do show int statu | i ( 60 )
	!RGXBLOCK ^[a-zA-Z]+[0-9]+\/[0-9]+\/[0-9]+
	int [regex]
	switchport access vlan 61
	description New VLAN
	exit
	!RGXBLOCK
	end
	wr mem
	exit
Description:
Step 1: Look up all ports set with VLAN 60 (do show int statu | i ( 60 ))
Step 2: Apply Regex to the return value: ^[a-zA-Z]+[0-9]+\/[0-9]+\/[0-9]+
The Regex matches all switchport names.
Step 3: Duplicate the commands between both !RGXBLOCK statements for each Regex match.
Step 4: Apply the configuration.
All steps are done during run-time
2.5. Separate configuration per device
Sometimes it is needed to use different configuration files for the devices.
Examples: snmp-location, hostname or IP address configurations.
A detailed Walk-through of the needed steps is available in section 3 of this document.
2.6. Multihop
Very often the network devices are only accessible via a network management device.
In this case it is needed to connect to this device as a first step, keep the connection and do the configuration of the network devices from there.
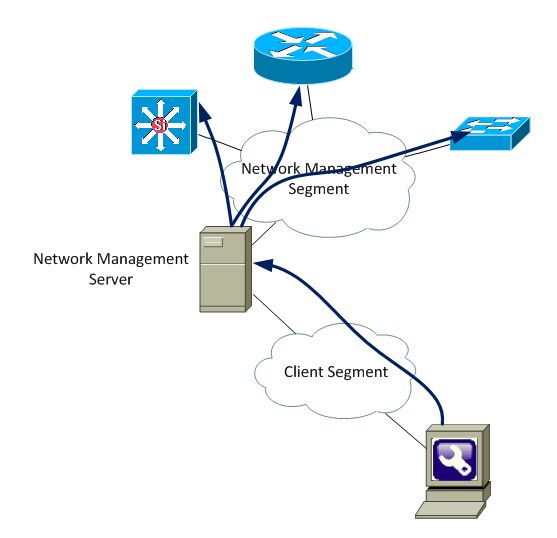
It is possible to have many devices between the wktools client and the network devices to configure. With MultiHop wktools never closes any connection by it's own. Therefore the user ALWAYS needs to take care of closing the connections by sending "exit" when the configuration is done. The configuration file for the Connection Hosts should never contain "exit" to keep the connection open until the last device was configured.
A detailled example is available in section 4 of this document.
3. Separate configuration per device and Configuration HowTo
The goal is to generate the needed configuration files and send them to the devices. In this example the snmp-community is configured.
3.1. Generate the needed configurations with wktools ConfigMaker 
To generate the needed configuration files wktools ConfigMaker may be used. The first step is the definition of a configuration template:
3.1.1. Template Definition
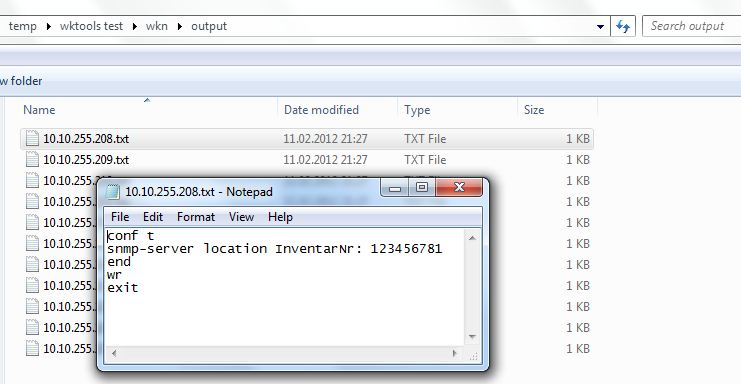
  conf t
  snmp-server location InventarNr: $inr;
  end
  wr
  exit
"$inr;" will be replaced by the associated value. Everything else is static in this example. Save this template as "conf.txt".
3.1.2. Data File
The data file contains the variables and associated values. The following file is used in this example:
   $ip;$inr
   10.10.255.208;123456781
   10.10.255.209;123456782
   10.10.255.210;123456783
   10.10.255.211;123456784
   10.10.255.212;123456785
   10.10.255.213;123456786
   10.10.255.216;123456787
   10.10.255.217;123456788
   10.10.255.227;123456789
   10.10.255.228;123456790
   10.10.255.233;123456791
The first line contains the variable names and the subsequent lines are for the values. The data file is saved as "data.csv".
3.1.3. ConfigMaker configuration
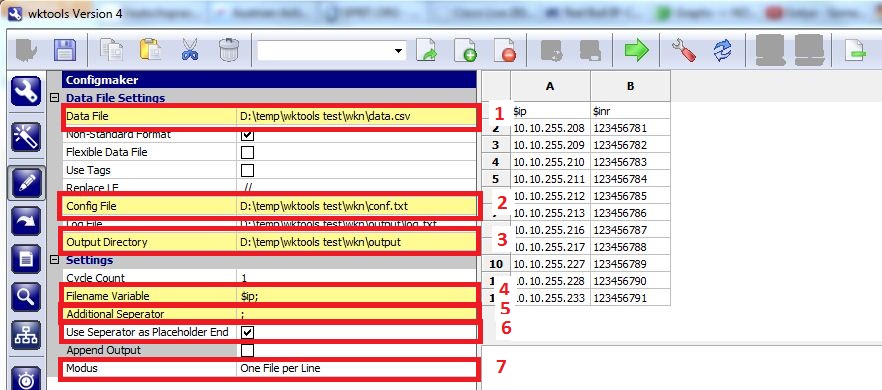
Needed Steps:
 and the config files will be generated.
Result:
3.2. Setup Configure Devices 
3.2.1. Hostfile
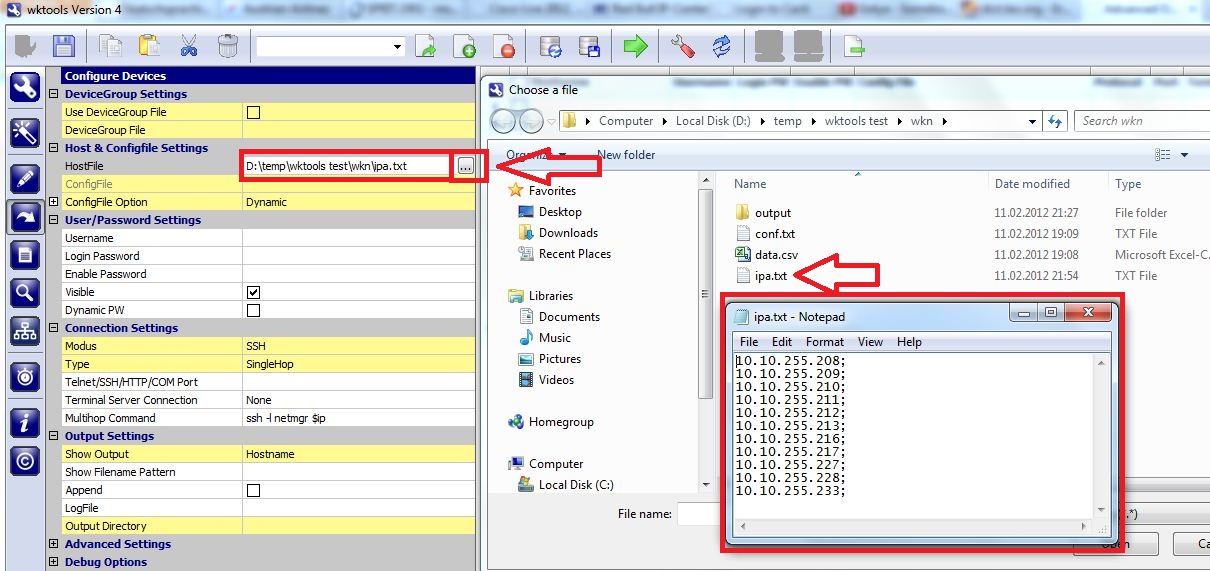
The hostfile contains all IP addresses/DNS names of the devices to configure.
3.2.2. Config File options
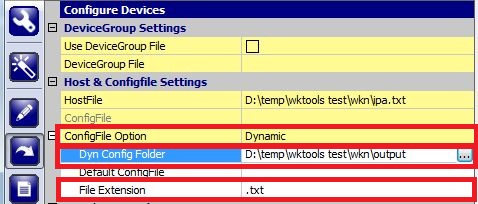
The config File Option "Dynamic" is used. This means that wktools looks up the needed configuration files in the specified folder. There is one file per host needed, except the "Dynamic+Default" option is used. The filenames must match the entries in the Hostfile. The File Extension must be used when the filenames consist of more than the hostname/IP address.
Use the "Static File" option when the same configuration is used for all devices.
The output directory, where the result for 3.1 was stored, is used as "Dyn Config Folder".
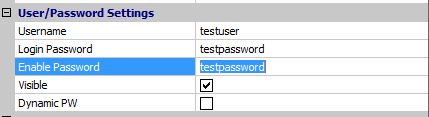
3.2.3. Username/Password settings
Define the needed credentials to access the devices.
3.2.4. Connection and Output settings
SSH SingleHop is used in this example. This means that a direct connection is established for all devices. For Multihop see section 4.
The output settings are mandatory, although they are not needed in this case.
3.2.5. Generate DeviceGroup File => 
After pressing the "DeviceGroup Window Refresh" button, the settings are checked and the device-specific settings are summarized in the DeviceGroup window.
The config files are now correlated with the devices.
3.2.6. Verify the DeviceGroup table and select devices to be configured.
Verify if all settings are correct. Each cell is editable and more lines may be added (right-click on any line).
Then select all devices which you want to configure.
The config file setting was filled in with the filenames found in the "Dyn Config Folder".
3.2.7. Start =>
With pressing the Start button, the config is pushed to the selected devices.
4. Multihop with a single configuration file
This example shows how to collect running configurations with the usage of Configure Devices - MultiHop.
4.1. Define the Hostfile
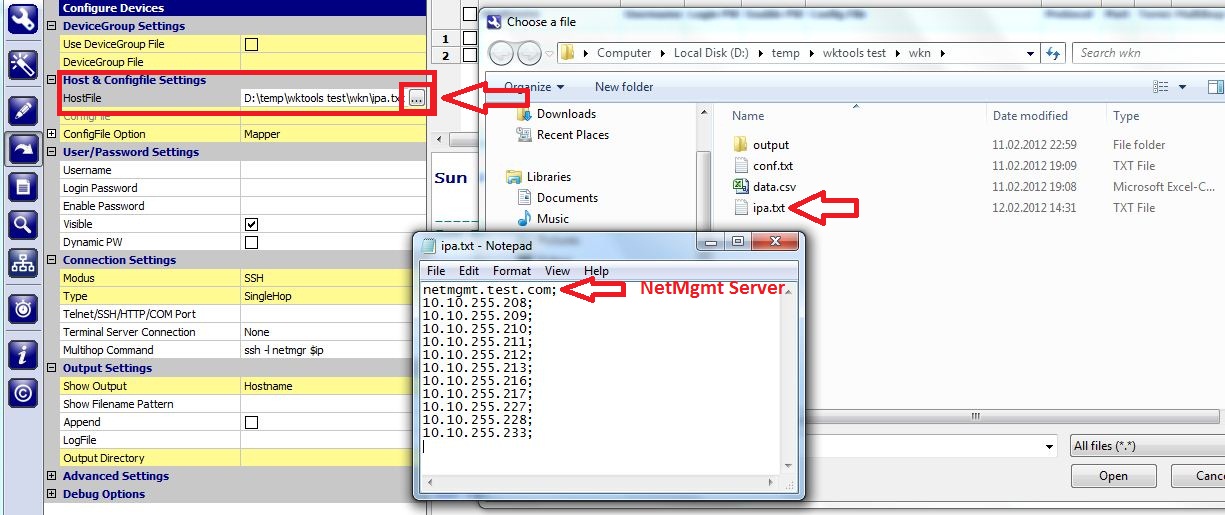
The hostfile contains all IP addresses/DNS names of the devices to configure. The first IP address is the Network Management Server IP from where all network devices are accessible.
4.2. Set Config File options
The configuration file is static in this scenario and it only contains two commands: "show run" to collect the configuration and "exit",
which is very important in this case, because otherwise wktools will not step back to the Network Management server.
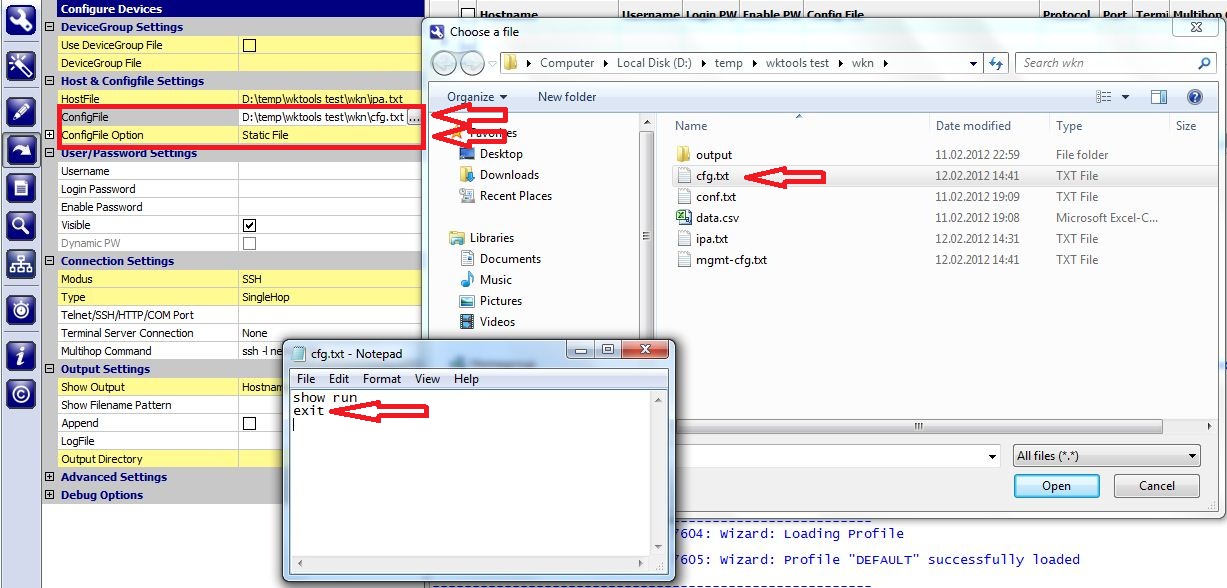
"cfg.txt" is the configuration file used for the network devices. The configuration file for the Network Management Server will be set later.
4.3. Username/Password settings
Define the needed credentials to access the devices.
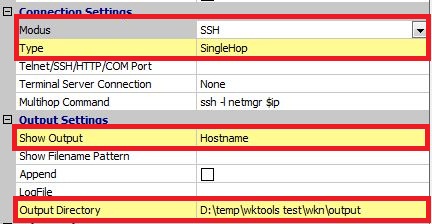
4.4. Connection Settings
SSH MultiHop is used in this example. This tells wktools to only establish one SSH connection and to keep it open.
The protocol must not be changed for any device - in other words, it must be the same for all devices.
The protocol for the remainig devices is set with the "MultiHop command" option.
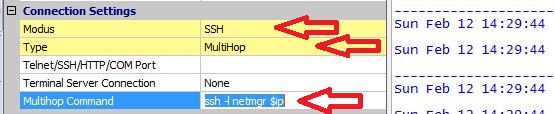
The "MultiHop command" option sets the command executed on the Network management server. The "$ip" variable is used as placeholder for the IP address which is then replaced on demand by the device IP.
4.5. Output Settings
Specify the filename option and directory to save the result.

With the "Show Output=Hostname" option the filenames will be derived from the device hostname. The "Output Directory" defines the folder where all show output files are saved.
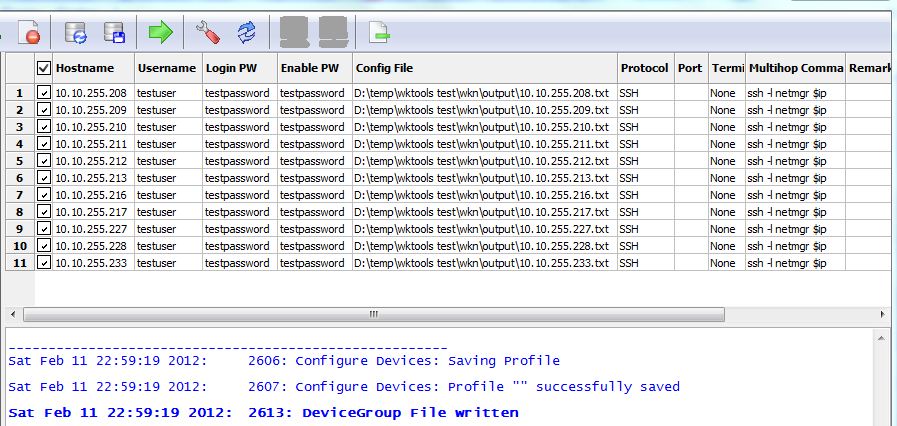
4.6. Generate DeviceGroup File =>
After pressing the "DeviceGroup Window Refresh" button, the settings are checked and the device-specific settings are summarized in the DeviceGroup window.
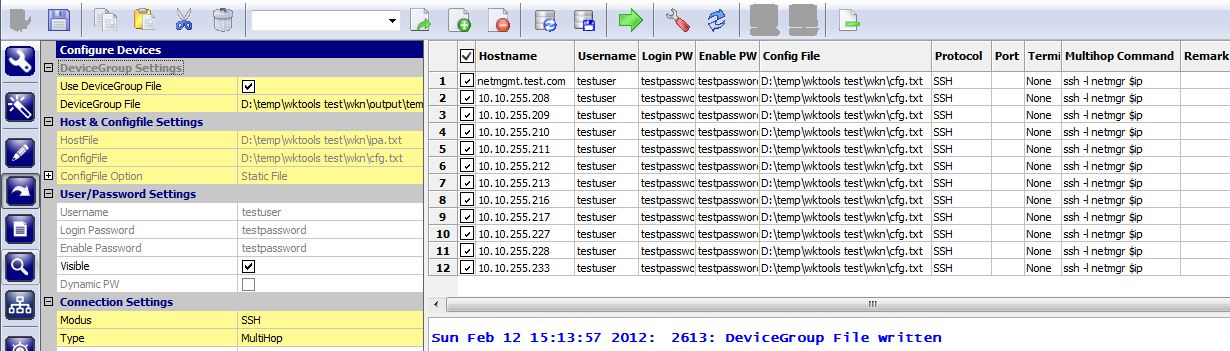
4.7. Modify the DeviceGroup view and set the correct config file for the Network Management server.
Verify if all settings are correct. Each cell is editable and more lines may be added (right-click on any line).
Then select all devices which you want to configure.
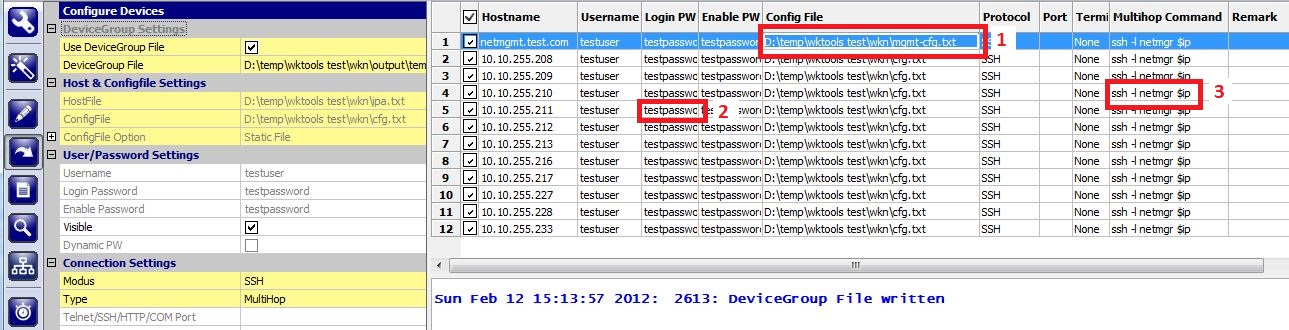
The first modification is the Config File for the first host (Network Management Server). This file may be empty and must not contain any command which would close the connection.
Number 2 is the used password for the device, and number 3 represents the command to connect to this device.
In the example it contains the command and username.
4.8. Start =>
With pressing the Start button, the config is pushed to the selected devices.
5. Reference
This section has some more background information on Configure Devices.
5.1. Important notes
 button to only display the error messages and hide everything else in the output window.
5.2. Wait for "#" before executing the next command
This is the recommended option and means that a command is only sent after the prompt is received from the remote device.
Under rare conditions it is needed to disable this setting, i.e. when configuring a banner. There are three ways to disable this setting:
#1: "Wait for Reply" under "Advanced Settings":

#2: !BEGINBLOCK and !ENDBLOCK config tags: When used in the configuration file, the "Wait for prompt" is only disabled for the commands in between the tags.
#3: !PARAGRAPH config tag: This is the best option, because all commands between two !PARAGRAPH tags are sent at once.
Be careful with disabling this setting! The whole wktools Send/Receive process relies very much on it.
5.3. Regular Expression Reference
The Perl Regex Syntax is used in wktools.
Use the Online Regular Expression Test Tool to test your Regular Expressions before using them.
5.4. Available Config Tags
| "!user = " | wktools takes this username to login to the remote device when the "Dynamic PW" option is enabled. |
| "!lopw = " | wktools takes this login password to login to the remote device when the "Dynamic PW" option is enabled. |
| "!enpw = | wktools takes this enable password to login to the remote device when the "Dynamic PW" option is enabled. |
| "!BEGINBLOCK" | wktools does not wait for the prompt before sending the next command. This is true for all commands after this line, until "!ENDBLOCK" is reached. |
| "!ENDBLOCK" | "Wait for prompt" is enabled again. See "!BEGINBLOCK" for more information. |
| "!PARAGRAPH" | Everything between two "!PARAGRAPH" statements will be sent at once ->
no need to wait for # and no need to use "BEGINBLOCK" and "!ENDBLOCK". This is the preferred method when banners or templates or similar things are configured with wktools. |
| "!CTRL+SHIFT+6 X" | Send Ctrl+Shift+6 x. Useful for connections with a terminal server |
| "show" | Collect any returning traffic and store it in a file until the next command is sent. |
| "!LOG" | It's working like "show" but for the subsequent command in the config file. Useful when the output for Non-Show commands is needed. |
| "!CRLF" | Sends a CR/LF to the remote host. |
| "!IFRETURN" | The return traffic of the previous command is searched for a regex. If the expression is found, the next command in the config file is sent, otherwise it is suppressed. Example: !IFRETURN \d\d\d\d: The next command is only sent, if a 4 digit number is found in the return traffic of the previous command. A perl compatible regular expression syntax is used for this feature. For more information please see Perl Regex Syntax |
| "!ELSERETURN" | Use only in conjunction with !IFRETURN. If the regex in !IFRETURN is not found, then the next command after !ELSERETURN is sent. |
| "!WARNING" | Use this tag to send a user defined warning message to the log window. The message is set in the same line.
Example: !WARNING: This is a test warning message! Nothing happens, only the message is printed to the log window. |
| "!ERROR" | Use this tag to send a user defined error message to the log window. The message is set in the same line.
After the message was printed, the whole remaining config is dropped and "end" and "exit" are sent to the remote device to close the connection.
Example: !ERROR: This is a test error message! The connection to the remote host is aborted! |
| "!EXIT" | Use this tag to clear the remaining config commands and send "exit" to the remote host. |
| "!ENDEXIT" | Use this tag to clear the remaining config commands and send "end" and "exit" to the remote host. |
| "[rgx]" and "[/rgx]" | Use the tags together with a normal command. The regex is applied on the return traffic from the previous command. The first match replaces the expression and the tags. This feature allows you to use variable commands -> the command is completed at runtime with data returned from the host. More than one regex may be used for a single command. Use separate [rgx] and [/rgx] tags for each regex. A perl compatible regular expression syntax is used for this feature. For more information please see Perl Regex Syntax Each regex result is saved and can be re-used with the [rgxMem] Tag. |
| "[rgxMem]" and "[/rgxMem]" | These tags are used to recall saved regex results. The index of each result is consecutive and starts with "0". The first regex in the config file gets index 0, the second one gets index 1 and so on... Example: ip address [rgxMem]0[/rgxMem] 255.255.255.252 - in this example, the regex result with index "0" is used as IP address. It was the first regex seen in the config file. |
| "!RGXCLEARMEM" | Resets "[rgxMem]" Memory |
| "!RGXBLOCK" and associated "[rgx]" | Everything between two !RGXBLOCK statements will be duplicated. A Regex is defined right after the first !RGXBLOCK and this Regex is applied on the preceeding return value. The commands between the two !RGXBLOCK statements are duplicated for each Regex match. Use [rgx] tags as placeholders together with the commands. The [rgx] tag will then be replaced by the Regex match. Multiple [rgx] Tags may be used, but they are always replaced by the same value. Example: conf t do show int statu | i ( 60 ) !RGXBLOCK ^[a-zA-Z]+[0-9]+\/[0-9]+\/[0-9]+ int [rgx] switchport access vlan 61 exit !RGXBLOCK end wr mem exitIn this example all Switchports in VLAN 60 will be reconfigured with VLAN 61. |
| "!cmd-prefix" | Usage: "!cmd-prefix STRING", where STRING is some prefix for the subsequent command. Example: !cmd-prefix CMD: show running-config Output will be: "CMD:show running-config" |
| "!device" | Usage: "!device PREFIX hostname|ip POSTFIX", where PREFIX and POSTFIX are optional. With this tag, the IP address or hostname with some optional pre/postfix will be added to the output file at the specified position. Example: "!device DEVICE ip" would be DEVICE 10.1.1.1 in the output file, when the device IP is 10.1.1.1 |
| "!remove-newline" | Remove all CR in the output file from this position to the end. |
| "!showOutput" | To define the show output file in the config file; This may be useful to split the show-output into several files Usage: "!showOutput sometext", where sometext is the pathname+filename of the output file. The following variables may be used at any position in "sometext":
|
5.5. DeviceGroup File
Normally the DeviceGroup file is generated by wktools. Optionally it may be created by the user.
This is very helpful when many fields are different between hosts.
Sample File:
wktoolsDgVer=3;
x;netmgmt.test.com;testuser;testpassword;testpassword;D:\temp\wktools test\wkn\cfg.txt;SSH;;None;ssh -l netmgr $ip;;;
x;10.10.255.208;testuser;testpassword;testpassword;D:\temp\wktools test\wkn\cfg.txt;SSH;;None;ssh -l netmgr $ip;;;
x;10.10.255.209;testuser;testpassword;testpassword;D:\temp\wktools test\wkn\cfg.txt;SSH;;None;ssh -l netmgr $ip;;;
x;10.10.255.210;testuser;testpassword;testpassword;D:\temp\wktools test\wkn\cfg.txt;SSH;;None;ssh -l netmgr $ip;;;
x;10.10.255.211;testuser;testpassword;testpassword;D:\temp\wktools test\wkn\cfg.txt;SSH;;None;ssh -l netmgr $ip;;;
x;10.10.255.212;testuser;testpassword;testpassword;D:\temp\wktools test\wkn\cfg.txt;SSH;;None;ssh -l netmgr $ip;;;
x;10.10.255.213;testuser;testpassword;testpassword;D:\temp\wktools test\wkn\cfg.txt;SSH;;None;ssh -l netmgr $ip;;;
x;10.10.255.216;testuser;testpassword;testpassword;D:\temp\wktools test\wkn\cfg.txt;SSH;;None;ssh -l netmgr $ip;;;
x;10.10.255.217;testuser;testpassword;testpassword;D:\temp\wktools test\wkn\cfg.txt;SSH;;None;ssh -l netmgr $ip;;;
x;10.10.255.227;testuser;testpassword;testpassword;D:\temp\wktools test\wkn\cfg.txt;SSH;;None;ssh -l netmgr $ip;;;
x;10.10.255.228;testuser;testpassword;testpassword;D:\temp\wktools test\wkn\cfg.txt;SSH;;None;ssh -l netmgr $ip;;;
x;10.10.255.233;testuser;testpassword;testpassword;D:\temp\wktools test\wkn\cfg.txt;SSH;;None;ssh -l netmgr $ip;;;
The first line always needs to be set to "wktoolsDgVer=3;".
Columns:
|
|
wktools Version 4 - Advanced Operations with "Configure Devices" |