
wktools Version 3 - Documentation
(c) 2003 - 2007 by Mathias Spoerr
Table of contents:
1 General
wktools is a collection of tools which simplify the work with network devices, especially Cisco devices. At this time there are the following tools included:
Configmaker, IP list, Configure Devices, Compare Files, Device Information Parser and PIX Session Status
How to work with these tools will be explaned in the following document.
1.1 License
The application is FREEWARE. Use at your own risk.
1.2 Questions and Feature Requests
Please send questions and Feature Requests to wktools@spoerr.org
1.3 Bug Reports
Please send Bug reports to wktools@spoerr.org
1.4 Using wktools
1.5 Automatic Version Check
This feature was added in wktools3 Version 3.3.0.0.
Wktools3 now checkes if there is a newer version available for download. It establishes a http session to www.spoerr.org and downloads a file with the version information. No other information is exchanged and all traffic is unencrypted.
Due to personal firewalls the version checker sometimes gets no connection and needs to timeout before the tool is startet. For the user it seems that the tool is not working.If this is the case for you, please set the following Registry Key from 1 to 0:
HKEY_LOCAL_MACHINE\Software\wktools\Settings\Updater
Value 2 of the Registry key will enable a debug mode for the Updater.
2 General Functions
2.1 Settings
The location of all settings saved by the application is "HKEY_LOCAL_MACHINE\SOFTWARE\wktools"
2.2 Context Help
Help information for a Control is shown when the mouse moves over the description related to this control.
2.3 Toolbar
The Toolbar consists of two parts: general Toolbar and wktools specific Toolbar.
2.3.1 General Toolbar
The buttons are:
2.3.2 wktools specific Toolbar

The controls:
2.4 Status Log
2.5 CLI Options
Use the CLI if you want to run a saved profile right after application startup.
The CLI syntax is as follows:
wktools3 [options] tool profile
Options:
|
-C |
Do not close the application after the tool has finished |
|
-S |
Save the output of the "Output" Tab to the log file specified in the Settings Tab |
|
cfgm |
ConfigMaker |
|
cfg |
Configure Devices |
|
ipl |
IP List |
|
cmp |
Compare Files |
|
dip |
Device Information Parser |
The profile name may consist of more than
one word.
3 Configmaker
With this tool you can generate configuration files in a fast and easy way. To achieve this, two files are needed: A pattern file and a Data file.
The pattern file includes the configuration. The variable parts are represented by a placeholder like $var.
The data file includes the placeholder names and the appendant values.
The output can be stored in two ways:
3.1 Format of the Data File
If the file is generated with MS Excel and line breaks within a cell are used, please check the "non-standard format" Checkbox. In this case, all "sub-linebreaks" are replaced by " // " and the existing Data file is overwritten with the new data to get compliant with the tool.
3.1.1 Data File enhancements
The following enhancements are possible:
3.1.1.1 non-standard format
Sometimes it is needed that Line breaks within cells are used in Excel sheets. In this case the line breaks are converted into csv with a LF character. A line break at the end of a line is specified with CR/LF. The LF onlys are now replaced with the string specified at the "Replace LF" option
3.1.1.2 Flexible Data File
In this case the LFs described under 3.1.1.1 are used to seperate data entries. Each entry is only used once. For an example see the Tutorials at www.spoerr.org/wktools.
3.1.1.3 Use Tags
Tags are specified with two beginning placeholder identifiers - i.e. $$n. With tags you can add Linebreaks or copy entries several times. To get an idea when you could use this option (in conjunction with 3.1.1.2) is, when generating object-groups where the number of entries could vary for each device.
Possible tags ($ is used in this example as placeholder indentifier):
3.1.2 Simple Example
Data and
placeholders:
| $hostname | $lip | $dlci | $sip |
| host1 | 10.1.1.1 | 100 | 10.1.2.1 |
|
host2 |
10.2.1.1 | 101 | 10.2.2.1 |
| host3 | 10.3.1.1 | 102 | 10.3.2.1 |
3.2.1 Example
config.txt:
3.2.2 Example when using "Use Seperator as Placeholder End" option
Additional Seperator = ";"
config.txt:
hostname
$hostname;
!
interface
Loopback0
ip
address $lip; 255.255.255.0
no shutdown
!
interface Serial0.$dlci;
point-to-point
ip address $sip;
255.255.255.252
frame-relay interface-dlci
$dlci; IETF
!
...
3.3 GUI explanation
|
Data File |
See 3.1 |
| Non-standard format checkbox | Use this option when the Data file is generated with MS Excel and line breaks within cells are used. |
| Flexible Data File | Used, when one cell has more than one data element |
| Use Tags | Tags are used in the config file and the tags are defined in the data file. See 3.1.1 for a list of available tags. |
| Replace LF | Replace Line Feeds (only) in the data file with this string. |
|
Config File |
See 3.2 |
|
Log File |
Not used at this time |
|
Output Directory |
The directory where the result should be stored |
| Cycle Count | Used to specify how often the replacement loop should run. Default is "1". |
|
Filename Variable |
The value of this placeholder will be taken as filename for the
output file. Additional
characters can be added to the variable as fix parts of the filename i.e. ->
variable is "$hostname", the seperator is ";" and the filename variable sould be
"$hostname;bla". In this case "bla" is added to each filename. NOTE: "Use Seperator as Placeholder End" must be checked if characters are added to the filename. |
|
Additional Seperator |
This char is used as seperator in the Data File |
| Use Seperator as Placeholder End | Use this option if there is no special
sign (see 3.2) between the placeholder and the data. Example: $testTEXT In this case it is not possible to identify the placeholder. With this option all the placeholders have the same ending char - the "Additional Seperator" Example: $test;TEXT Now the $test; placeholder can be identified and replaced by the data. Result (data for $test = 1234): 1234TEXT |
|
Modus |
The result will be stored in one file or in seperate files |
|
Append Output if.... |
If the output file already exists, the file will be replaced or the new output will be appended |
4 IP List
Use this tool to search configuration files in a directory, including sub directories, for IP addresses of a specified Interface. The result will be stored in a file.
The files to search can be restricted using search patterns for the file name.
4.1 GUI explanation
|
Directory to search |
Folder, including sub Folders, which will be searched for configuration files |
|
Output Directory |
The directory where the result should be stored |
|
Interface |
The name of the Interface from which the IP address should be taken. The Interface number is entered in the second field. |
|
Search Patterns |
|
|
Modus |
The result will be stored in one file or in seperate files |
|
Append Output if.... |
If the output file already exists, the file will be replaced or the new output will be appended |
5 Configure Devices
With this tool you can automatically configure Cisco IOS, CatOS, PIXOS devices. Aside these boxes also Linux with the following prompt ending can be used: "$ ".
The supported protocols to achieve this are Telnet, SSHv1, SSHv2, HTTP, Serial Console. This protocols can be combined with one of the following connection types:
 WARNING! MultiHop: Don't forget "exit" at the end of the
configuration file, because it is not sent per
default!
WARNING! MultiHop: Don't forget "exit" at the end of the
configuration file, because it is not sent per
default!
When using the serial console, either COM1 or COM2 are used to connect to the network. From this first hop, all the other devices are configured. Only MultiHop is possible in this case.
When using HTTP, all output is saved in a file. The config file must contain the urls to request. When using an empty config file, ip-address/ is downloaded and saved. At this time only one URL is supported. If you cannot live with this limitation, please smend me an email.
If there are "show" commands in the configuration, the output is stored in a file. The filename is either the Hostname or the IP address of the device or one file for all devices.
WARNING! "show" must be
written out in full! Otherwise the output will not be
saved.
The devices can have different configuration files and/or Username/Passwords. For different Usernames/Passwords there are two possible methods:
|
Less or equal three different Usernames/Passwords |
|
|
More than three different Usernames/Passwords |
|
Software upgrade for IOS devices is supported. The configuration file must include the following lines:
copy tftp flash:
5.1 Device Groups
With Version 3.1 a new feature was added: Device Groups. This feature allows you to add the whole dynamic information with one csv file. If the Device Group file is not used, the Tool generates its own file. The information used to configure the devices is displayed in the "Device Group Tab". The data format is a List. In front of each entry there is a checkbox to select the Hosts for the next run - only checked lines are used.
Every entry in the list can be edited and new lines can be added. The information provided from the list is the data basis for configuring the devices. The list is temporary stored in "tempDevGroup.txt". By pressing the "SAVE" Button in the Toolbar the list data can be exported to a file.
The Configuration File can be viewed by right clicking the config file name in the Device Group and using the "Show Config File" option in the popup menu.
If the Device Group data is generated by the tool, the settings in the "Settings Tab" change to "Use Device Groups" and the temporary Device Group File is added to the Edit Control.
To add a new line simply place the cursor in the last line and press "key-down".
Limitations: The first element in the table must be checked when using MultiHop. The used protocol in all lines must be the same for Multihop. The used protocol for connections from the first device is specified under "Multihop Command" setting.
5.1.1 Format of the Device Group File
Checkbox state "x" for checked; leave blank for unchecked Hostname IP Address or DNS name Username Username Login Password Login Password Enable Password
Enable Password Config file Config File to use Protocol
- Telnet
- SSHv1
- SSHv2
- COM1
- COM2
Port Port where Service is available at remote host Terminal Server Terminal Server Options Multihop command When using Multihop, then this command should be used to get to the next IP Address Remark Column for Remarks. They have no consequences for the configuration sequence and are only for helping the user interpreting the lines.
5.2 Format of the IP address File
5.2.1 Example
5.3 Configuration File
5.3.1 Example of a config file with dynamic Username/Password
!user = username -> Username
5.4 GUI explanation
5.4.1 Device Group Settings
|
Use Device Groups Checkbox |
Use Device Group File (csv) instead of the settings below |
|
DeviceGroup File |
csv File to use |
5.4.2 File Settings
|
IP Address File |
See 5.2 |
|
Config File |
See 5.3 |
|
dynamic Checkbox |
Check, if you want to use a seperate configuration for every device |
|
dyn Config Folder |
The folder where all specific configuration files can be found |
|
File extension |
The extension for the specific config files. Keep this field empty if there is no extension. Don't forget the dot (.) |
|
default Checkbox |
Check, if you want to use a default Configuration File. |
|
default Configuration File |
The default configuration File. This configuration is used when no specific configuration is found. |
5.4.3 Password Settings
|
Username |
Username to access the devices |
|
Login Password |
Login Password to access the devices |
|
Enable Password |
Enable Password to access the devices |
|
visible Checkbox |
Check, if you want to hide the entered values |
|
dynamic Checkbox |
Check, if you want to use dynamic Username Passwords |
For more information on how to use more than one Username/Password, please refer to the main description of this Tool (See 5)
5.4.4 Modus
|
Modus |
Protocol to use |
|
Type |
Connection type, See 5 |
| Telnet/SSH Port | Port, where Telnet or SSH service is running on server side. Leave empty if standard ports should be used. |
| Terminal Server Connection | Three options:
|
|
Multihop Command |
Command to use when hopping from the first device to the next Example: "telnet" OR "ssh -c des" It is possible to have a command where the IP address is not at the end. For example: telnet 1.1.1.1 23. In this case the varable $ip is used. Example: "telnet $ip 23" or "telnet $ip:23" |
5.4.4 Advanced Settings
|
Show Output |
Specify the filename type for the show output - See 5
|
| Append Checkbox | If unchecked, override an existing file. |
|
Exec Mode |
what should be sent at login Mode (router>)? Default: "enable" |
|
Log File |
Specify the file where all log output is saved |
|
Output Directory |
The directory where all "show" files are stored |
|
Wait for reply |
The program waits for a reply (#) from the device before the next command is sent. Sometimes it is useful to disable this behaviour. For example when configuring a banner message. In this case the device does not send a # before the break character is sent.
The better way to send commands to the remote host, where no "#" is sent back as reply, is to use the !PARAGRAPH marker in the config. Please refer to 5.5 for more infos.
There is a second way to disable "Wait for reply" temporarily: Use !BEGINBLOCK and !ENDBLOCK markers in the configuration file. At !BEGINBLOCK waiting is disabled and at !ENDBLOCK waiting is enabled again. The commands are placed between these two markers. |
|
Configure "logging sync" |
Check, if you want to configure "logging sync" at all vty lines. This is useful to parse the error messages from an IOS device. Please refer to Cisco IOS Command reference for more information on this command. |
|
Command in case of wrong password |
There are two choices in case of a wrong enable password:
|
5.5 Special Config Tags
There are some tags which could be used in the configuration file for special handling. Some of them were already recognized above. Here is a complete list of them:
| "!user = " | Username can be specified for use with dynamic Username and Passwords |
| "!lopw = " | Login Password can be specified |
| "!enpw = | Login Password can be specified |
| "!BEGINBLOCK" | Begin not to wait for # befor sending the next command |
| "!ENDBLOCK" | End not to wait for # befor sending the next command |
| "!PARAGRAPH" | Everything between two "!PARAGRAPH"
statements will be sent at once -> no need to wait for # and no
need to use "BEGINBLOCK" and "!ENDBLOCK". This is the preferred method when banners or templates or similar things are configured with wktools. |
| "!CTRL+SHIFT+6 X" | Send Ctrl+Shift+6 x. Useful for connections with a terminal server |
| "show" | Collect every returning traffic and store it in a file until the next command is sent. |
| "!LOG" | It's working like "show" but for the next command in the config file. |
| "!CRLF" | Sends a CR/LF to the remote host. |
6 Compare Files
With this tool you can compare two files. The result is stored in html Format and the differences between the files are highlighted.
6.1 GUI explanation
|
File 1 |
The name of the first file |
|
File 2 |
The name of the second file |
|
Output Directory |
Folder, where the result is saved |
|
Output Filename |
The filename of the html output |
| Indent Check Box | Remove or keep indent |
| Case Check Box | Case sensitive comparison |
7 Device Information Parser
This tool parses text files with show output from Cisco devices. Currently there are two parser implemented:
7.1 Inventory Parser
With this Parser you can easily do an inventory of your installed base of Cisco devices.The following information is collected and saved as csv:
The output will be a comma seperated file (.csv).
7.1.1 Supported Devices
Since nearly every Cisco device has different show commands and format for the output, not all devices are supported. At this time it is tested with the following hardware:
7.1.1.1 Cisco Router
7.1.1.2 Cisco Switches
7.1.1.3 Cisco - Other
It may work for other IOS or CatOS hardware but there is no guarantee for it. If you have problems with any kind of IOS/CatOS hardware please send an email to wktools@spoerr.org.
7.1.2 Format of the file to parse
When the data is collected, the following template must be used, even if some of the commands are not supported by some or all devices. If the template is not used, the result is unspecified.
7.1.2.1 Template for all devices except 6200 DSLAMs
show ver ! Version Information7.1.2.2 Template for 6200 DSLAMs
show ver
7.1.2.3 Cisco IP Phones
The information for IP Phones is collected with http. All information is collected at the main page of an IP Phone (ip-address/)
7.2
Interface Information
Parser
With this Parser you can collect interface status information like sent/received Packets or Bytes or Interface errors. At this time only IOS devices (routers and switches) are supported.
The output will be comma seperated file (.csv) with ";" as seperators.
The information the parser uses to collect the statistics is from "show version" and "show interfaces" output. The output of each device has to be stored in a seperate file and the output of both commands must be collected. Otherwise the Parser will fail.
7.3 GUI explanation
|
Search Directory |
Folder, not including sub Folders, which will be searched for configuration files |
|
Search Patterns |
|
|
Output Directory |
The directory where the result should be stored |
|
Output File Name |
The name of the csv file |
|
Append |
If the output file already exists, the file will be replaced or the new output will be appended |
| SNMP Location columns | The number of the SNMP location columns. This
feature can be used to read csv information in the snmp
location. Sometimes there are ";" used in snmp locations. If this is the case, specify the number of ";" +1 in this option => minimum is 1. This option is only available for the Inventory Parser. |
| Only collect chassis information | Only one line per device is added to the output file. This line includes the chassis information like S/N, memory, Version... |
| Show the following columns | Uncheck the Column you do not want to have in your
output. This option is only available for the Inventory Parser. |
| Don't collect Interface Descriptions | This option should be used if you have ";" in your
Interface Descriptions. If ";" are used, the output would be
shifted because a ";" is used as indicator for a new column. This option is only available for the Interface Parser. |
8 PIX Session Status
Use this tool to check the active sessions on a PIX firewall. The output is displayed in a table.
Supported protocols to connect to PIX are Telnet, SSHv1, SSHv2 and serial console
8.1 GUI explanation - Settings
|
IP address |
IP address of the PIX firewall |
|
Modus |
Protocol to use |
|
Username |
Username to access the PIX firewall |
|
Login Password |
Login Password to access the PIX firewall |
|
Enable Password |
Enable Password to access the PIX firewall |
|
visible Checkbox |
Check, if you want to hide the entered values |
8.2 GUI explanation - Output
8.3 GUI explanation - Filter Bar
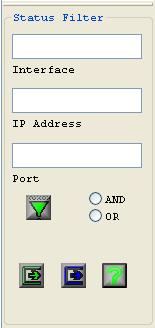
With this Filter Bar you can filter and update the output for Interaces, IP addresses and Port numbers.
8.3.1 Buttons
 Filter - Set and
reset the Filter
Filter - Set and
reset the Filter
 How the entries in
the three fields are linked together
How the entries in
the three fields are linked together
 Update only this View
 Update all Views
 Image Help: Shows the meaning of the displayed icons
8.4 GUI explanation - Icons used in the tables
![]()
9 Scheduler
The Scheduler is used to create on-demand or scheduled tasks for "Config Tools".
The GUI consists of a list of all tasks at the left hand side and some controls on the right hand side.
9.1 GUI explanation - Task list

|
Checkbox |
Checked items will be processed by clicking the Start or Delete Button |
|
State |
Status information |
|
Name |
Unique name of the task - This name will be used for Windows Tasks |
|
Tool |
Tool name |
| Profile | Saved profile |
| Date and Time | Date and time when to run this task. |
| Repeat |
How to run this task:
|
9.2 Task Types
9.2.1 On-Demand Tasks
These tasks are only executed when they are selected (checked) and the Start Button is pressed. The tasks run one after another. It is not possible that two or more tasks run parallel.
9.2.2 Scheduled Tasks
Scheduled tasks are activated and stored as Windows task by clicking the "Start" Button. All saved Windows Tasks are listed in the "Scheduled Tasks" window:
Click Start, click All Programs, point to Accessories, point to System Tools, and then click Scheduled Tasks.
Please specify Username/Password in the Settings section. This account information is used to create and run the task.
9.3 GUI explanation - Controls Panel
9.3.1 Scheduled Items control
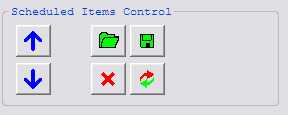
With the UP/Down Buttons selected list items are moved one row up or down.
The Open/Save Buttons are for saving the complete list as csv file or open a saved list.
The Delete Button is used to delete all checked list entries. If the entry is a scheduled Task, the Task is also deleted from the Windows Task Entry List. This is only true for entries with status "-- SCHEDULED --".
The Replace Button is used to replace the selected list entry with the settings entered in the "New Scheduler Entry" controls.
9.3.2 New Scheduler Entry
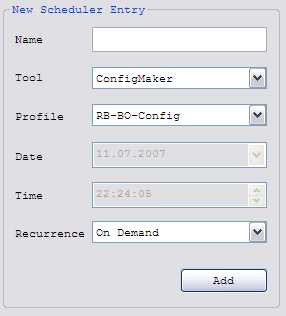
After pressing "Add", a new line in the List Control is generated. For detailed information of the controls please take a look at 9.1.
9.3.3 Settings
At this time the following three options are available in this section.
SchedFile Folder
Username
Password
When the Start Button is pressed, the list
is exported as csv. The file is stored in the folder specified here.
Username used to create and run the task. This setting is not saved in the Registry.
Password for the above username. This setting is not saved in the Registry.